Fishtail, Dutch & Waterfall Braids: A Beginner's Guide to Mastering 3 Stunning Techniques | Pro Hair Tips
From Timeless Classic to Modern Chic: Your Braiding Journey Starts Here
Braids have woven their way through history, representing strength, culture, and timeless beauty. From ancient traditions to modern runways, braided hairstyles remain a versatile and elegant way to express personal style. While intricate braids might seem daunting, many of the most stunning looks are built on simple, foundational techniques. This comprehensive beginner's guide to braiding techniques is designed to demystify the process, focusing on three popular and achievable styles: the ethereal Fishtail, the bold Dutch, and the romantic Waterfall braid. Whether you're looking to elevate your everyday look, prepare for a special occasion, or simply learn a new skill, you've come to the right place.

Mastering these three styles will provide you with a solid foundation in hair artistry. Each braid offers a unique aesthetic and can be adapted for various hair types and lengths. We'll break down each technique into simple, easy-to-follow steps, share professional tips for perfecting your craft, and troubleshoot common mistakes that beginners often face. Forget frustration and tangled messes; it's time to unlock your inner stylist and transform your hair into a work of art. Prepare to be patient with yourself, practice consistently, and soon you'll be creating beautiful, head-turning braids with confidence and ease.
The Foundation: Essential Tools & Hair Prep for Braid Success
Before you start weaving, gathering the right tools and properly preparing your hair is a non-negotiable step for achieving clean, long-lasting braids. Think of it as a chef organizing their ingredients before cooking; proper preparation ensures a smoother process and a more polished final result. Rushing into braiding without these fundamentals can lead to frizz, loose strands, and a style that falls apart within hours. Taking just a few extra minutes to set yourself up for success will make a world of difference in your braiding journey, especially when you're just starting out.
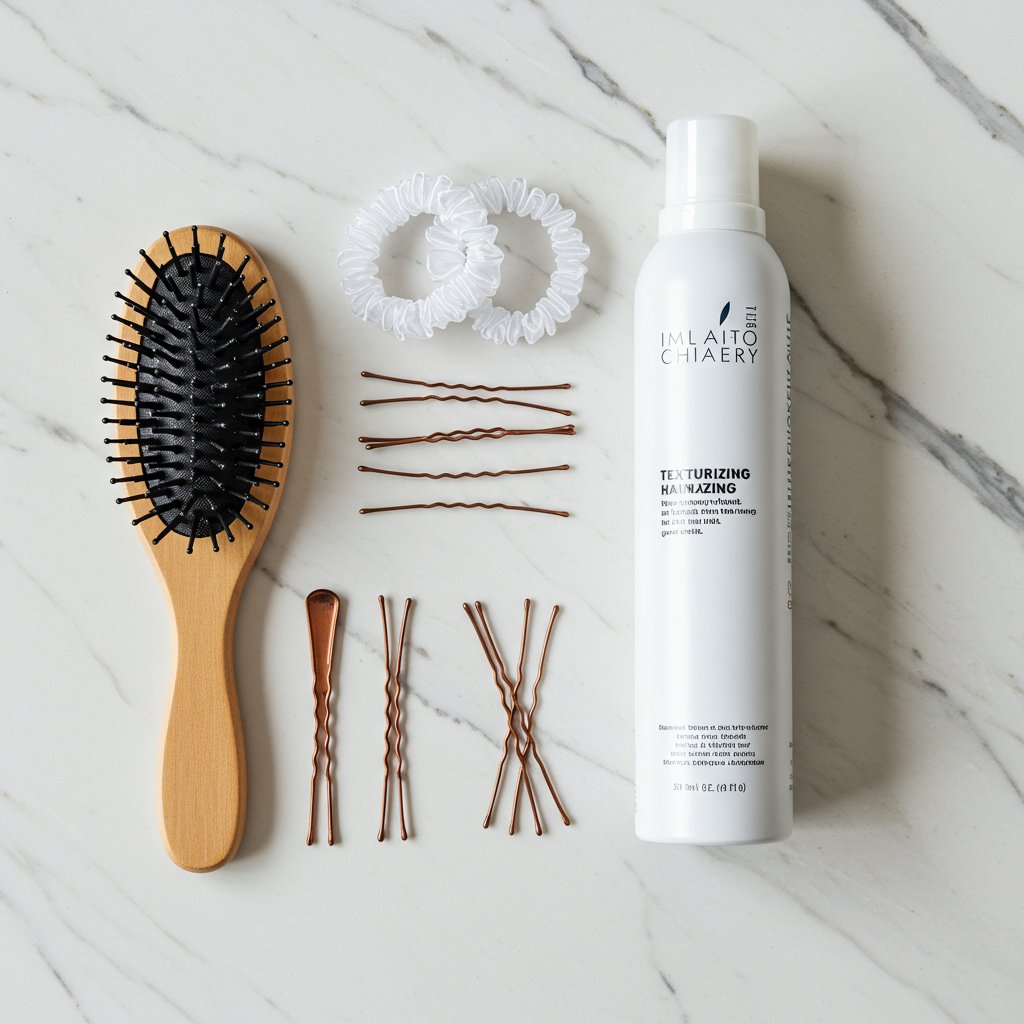
Your essential toolkit is simple. You'll need a good quality detangling brush or a wide-tooth comb to ensure your hair is smooth and knot-free. A handful of small, clear elastics are perfect for securing braids without distracting from the style. For more complex updos or to tame flyaways, have some bobby pins on hand that match your hair color. The secret weapon for many stylists is a texturizing spray or powder; this product adds grip and grit to slippery, clean hair, making it much easier to handle and hold the braid's shape. Finally, a light-hold hairspray will be your best friend for setting the finished style and taming any unruly strands without making your hair feel stiff or crunchy.
When it comes to hair prep, many find that braids hold best on hair that isn't freshly washed. Day-old hair often has more natural texture and grip. If you must work with clean hair, this is where your texturizing spray comes in. Apply it lightly from mid-lengths to ends. Thoroughly brush your hair to remove all tangles, as even a small knot can disrupt the entire braiding pattern. Divide your hair into the initial sections required for your chosen braid before you begin the weaving process. This methodical approach helps maintain even tension and prevents you from getting lost halfway through the style.
Mastering the Fishtail Braid: An Elegant Two-Strand Weave
The Fishtail braid is a crowd favorite for its intricate, almost herringbone-like appearance that looks far more complicated than it actually is. Unlike traditional braids that use three strands, the fishtail relies on just two main sections, making it a fantastic entry point for beginners. Its aesthetic is effortlessly chic and bohemian, perfect for everything from a casual weekend brunch to an elegant evening event. Once you master the simple rhythm of crossing small pieces of hair from one side to the other, you'll be able to create this stunning look in minutes.
Step-by-Step Instructions
- Divide and Conquer: Start by brushing your hair to remove any tangles. You can style it as a classic ponytail or leave it down for a side-swept look. Divide your hair into two large, equal sections.
- The First Cross: Take a small piece of hair—about half an inch wide—from the outer edge of the left section.
- Weave It In: Pull this small piece across the top of the left section and add it to the inner edge of the right section. The two main sections should still be distinct.
- Repeat on the Other Side: Now, do the same on the opposite side. Take a small piece from the outer edge of the right section, cross it over the top of the right section, and merge it with the inner edge of the left section.
- Continue the Pattern: Repeat this back-and-forth pattern all the way down the length of your hair. The key to a defined fishtail is to use consistently small pieces. The smaller the pieces, the more intricate the braid will look.
- Secure Your Braid: Once you reach the end, secure the braid with a clear elastic.
Pro Tips for the Perfect Fishtail
For a fuller, more voluminous look, gently pull on the edges of the braid after it's secured. This technique, known as "pancaking," creates a softer, more romantic, and lived-in feel. Don't be afraid to pull it apart more than you think; it's this imperfection that gives the fishtail its signature bohemian charm. If you prefer a sleeker, more polished finish, use a touch of smoothing serum on your fingers as you braid to minimize flyaways and keep the sections clean.The Dutch Braid: A Bold, 3D Statement
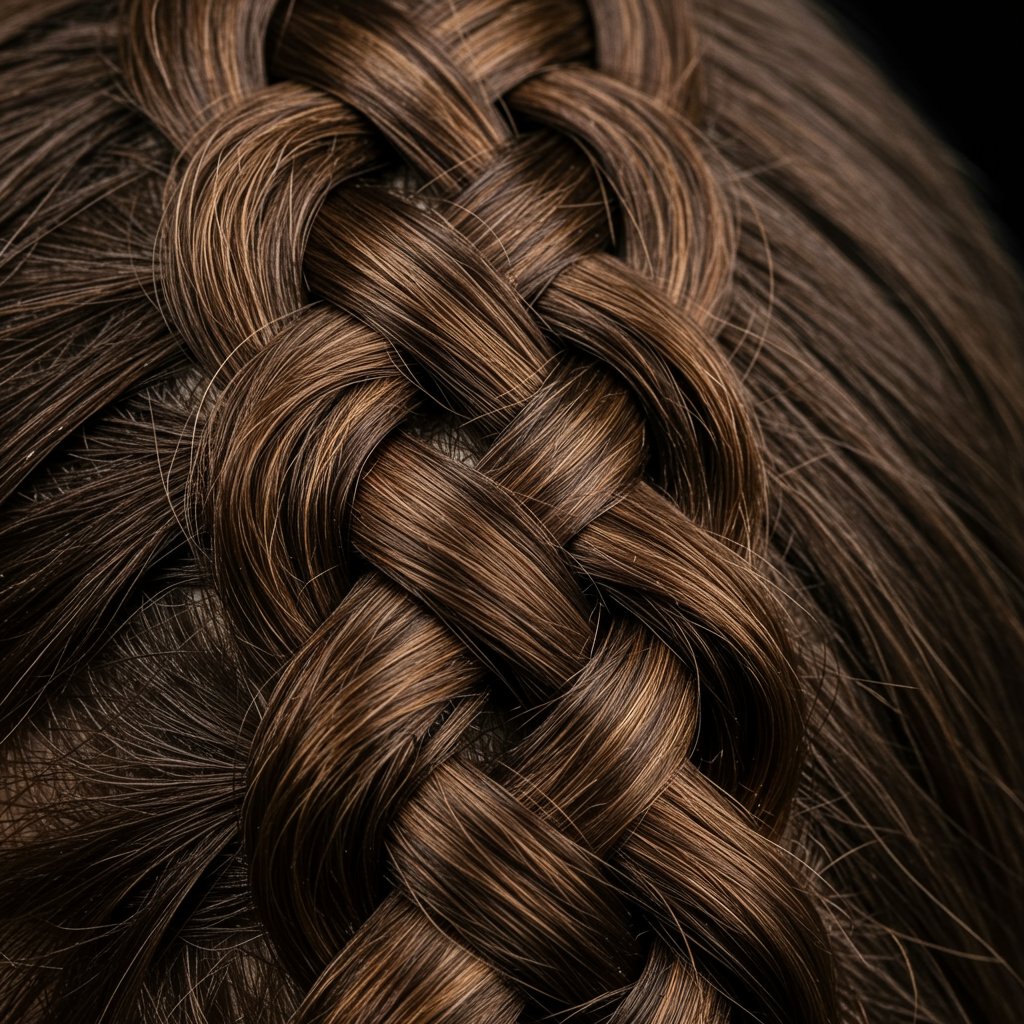
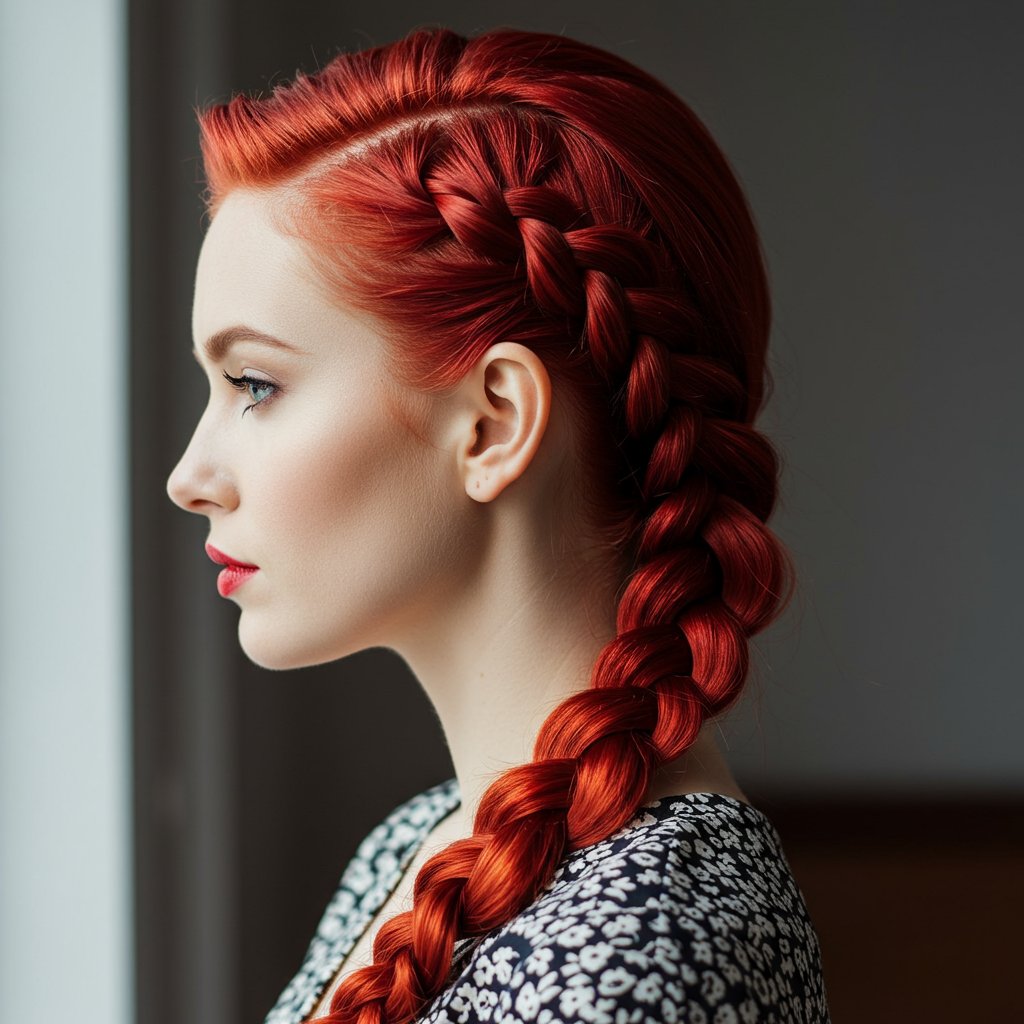
If you're looking for a braid that truly stands out, the Dutch braid is your answer. Often called an "inside-out" or "reverse" French braid, this technique creates a raised, three-dimensional plait that sits on top of the hair rather than being woven into it. The effect is bold, striking, and incredibly versatile. It's the foundation for popular styles like boxer braids and crown braids, and it adds an element of edgy sophistication to any look. While it uses three strands like a classic braid, the unique underhand weaving method is what gives it its signature pop.
Step-by-Step Instructions
- Create Your Starting Section: Take a triangular section of hair from your hairline or wherever you want the braid to begin. Divide this section into three equal strands: left, middle, and right.
- The Underhand Weave: Begin by taking the right strand and crossing it under the middle strand. The right strand is now the new middle strand.
- Repeat on the Left: Next, take the left strand and cross it under the new middle strand. The left strand now becomes the middle.
- Start Adding Hair: Now, you'll begin incorporating more hair. Take the right strand again, but this time, gather a small, new section of hair from the right side of your head and add it to that strand.
- Cross Under Again: Cross this newly thickened right strand under the middle strand.
- Repeat and Continue: Do the same on the left side: gather a new section of hair, add it to the left strand, and cross the entire thing under the middle. Continue this pattern, adding hair and crossing under, all the way down to the nape of your neck.
- Finish the Braid: Once you've incorporated all the hair, continue with a regular three-strand braid (still crossing under for consistency, or over if you prefer) to the ends and secure with an elastic.
Dutch Braid Variations
Once you've mastered the single Dutch braid, the possibilities are endless. Part your hair down the middle and create two Dutch braids for the classic "boxer braid" look. For a romantic updo, you can create a Dutch braid along your hairline and wrap it around your head to form a stunning crown braid. The technique remains the same; only the placement and direction change.The Waterfall Braid: A Cascading Romantic Style
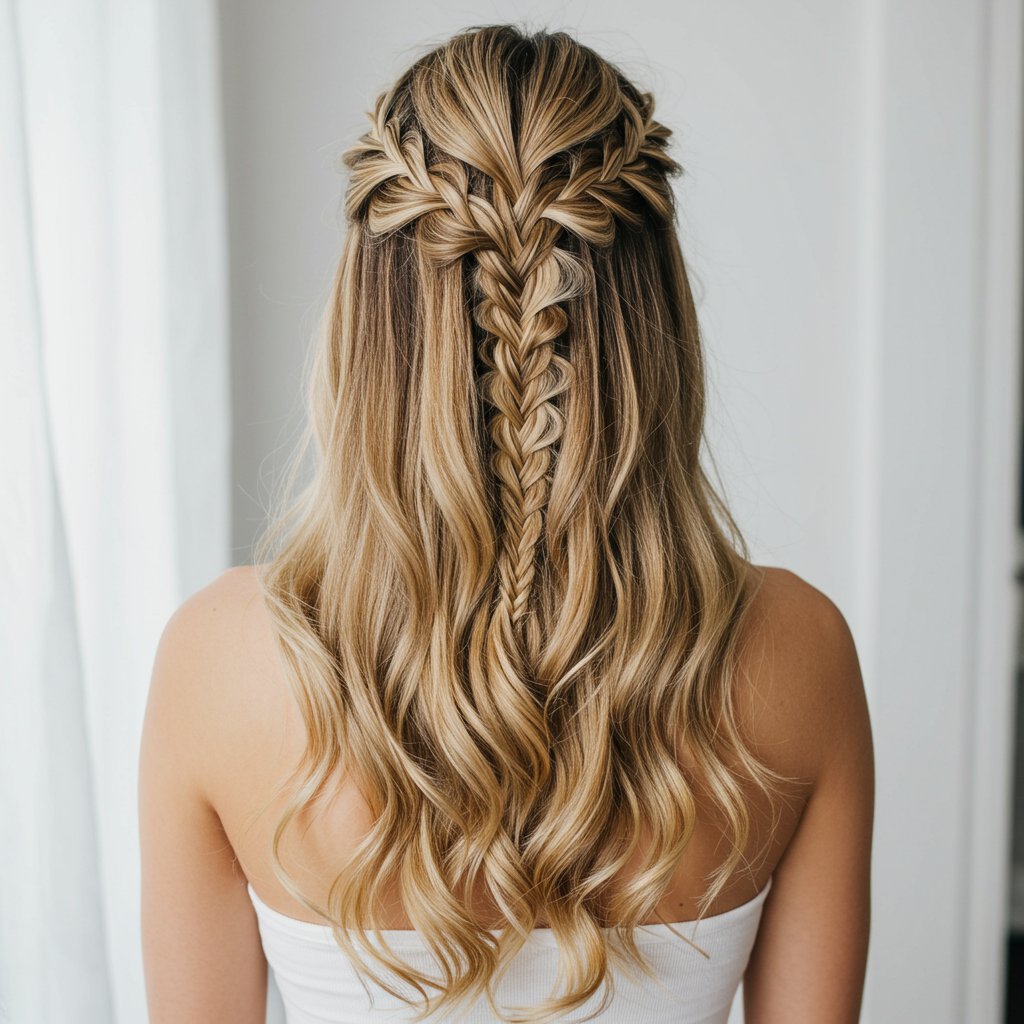
The Waterfall braid is arguably one of the most romantic and ethereal hairstyles. It gets its name from the way strands of hair are dropped from the braid, creating a cascading effect that flows through loose hair like a waterfall. It’s a modified French braid technique that looks incredibly intricate but is surprisingly simple once you understand the core concept of "dropping" a strand. This style is perfect for weddings, proms, or any occasion where you want a soft, dreamy look. It works beautifully on both straight and wavy hair, but truly comes to life when paired with soft curls.
Step-by-Step Instructions
- Start at the Front: Take a small section of hair near your part and temple. Divide it into three equal strands: top, middle, and bottom.
- Begin the Braid: Start as you would a standard French braid. Cross the top strand over the middle strand. Then, cross the bottom strand over the new middle strand.
- Add Hair to the Top: Now, take the top strand again. Gather a small section of loose hair from above the braid and add it to this top strand.
- Cross It Over: Cross this newly thickened top strand over the middle strand.
- The Waterfall Drop: This is the key step. Instead of crossing the bottom strand over, simply drop it. Let it fall and hang loose with the rest of your hair.
- Pick Up a New Strand: Pick up a new section of hair of a similar size from right beside the strand you just dropped. This becomes your new bottom strand.
- Cross the New Bottom Strand: Cross this new bottom strand over the middle strand.
- Continue the Pattern: Repeat steps 3-7. Continue adding hair to the top strand, crossing it over, dropping the bottom strand, and picking up a new one. Work your way across or around your head as desired.
- Secure the End: Once you've braided as far as you want, you can secure the end of the braid with a bobby pin behind your ear or continue it into a regular three-strand braid down the side.
Styling the Waterfall Braid
To truly enhance the cascading effect, it’s best to curl or wave your hair before you start braiding. The texture and movement of the curls will make the "waterfall" strands blend beautifully and create a more cohesive, professional-looking style. This braid acts as a beautiful accent, a sort of hair headband, that elevates simple, loose hair into something truly special.Common Braiding Mistakes and How to Fix Them
Every braiding expert was once a beginner, and making mistakes is a natural part of the learning process. The key is to identify what's going wrong and learn how to correct it. Most beginner issues stem from a few common problems related to tension, sectioning, and finishing. Don't get discouraged; with a little troubleshooting, you can overcome these hurdles.

Mistake 1: Losing Tension
The most frequent issue is a braid that starts strong but becomes loose and messy halfway through. This is a problem of tension. The Fix: Keep your hands and fingers as close to the scalp as possible while you braid. This proximity gives you more control and helps maintain a firm, even grip on the strands. As you weave, gently pull each section taut before crossing it over or under.Mistake 2: Uneven Sections and a Lopsided Braid
Does your braid look thick on one side and thin on the other? This happens when you add uneven amounts of hair to your strands. The Fix: Slow down. Use a mirror to watch your hands and the sections you're grabbing. Try to make each new piece of hair you add consistent in size. At the beginning, it can even be helpful to use the tail of a comb to create clean, precise partings for each new section.Mistake 3: The Braid Looks Flat and Lifeless
You've finished your braid, but it lacks the volume and impact you see in photos. The Fix: Embrace the "pancaking" technique mentioned earlier. Once your braid is secured with an elastic, start at the top and gently pull on the outermost loops of each plait. Work your way down, pulling evenly on both sides. This expands the braid, making it appear thicker and more texturized. A little texturizing powder before you pancake can add extra grit and hold.Pro Tips for Long-Lasting Braids
There's nothing more frustrating than spending time creating a beautiful braid only to have it frizz up or fall out a few hours later. The secret to all-day (and sometimes all-night) hold lies in the products you use and the techniques you employ. A few simple adjustments to your routine can dramatically increase the longevity of your braided style.
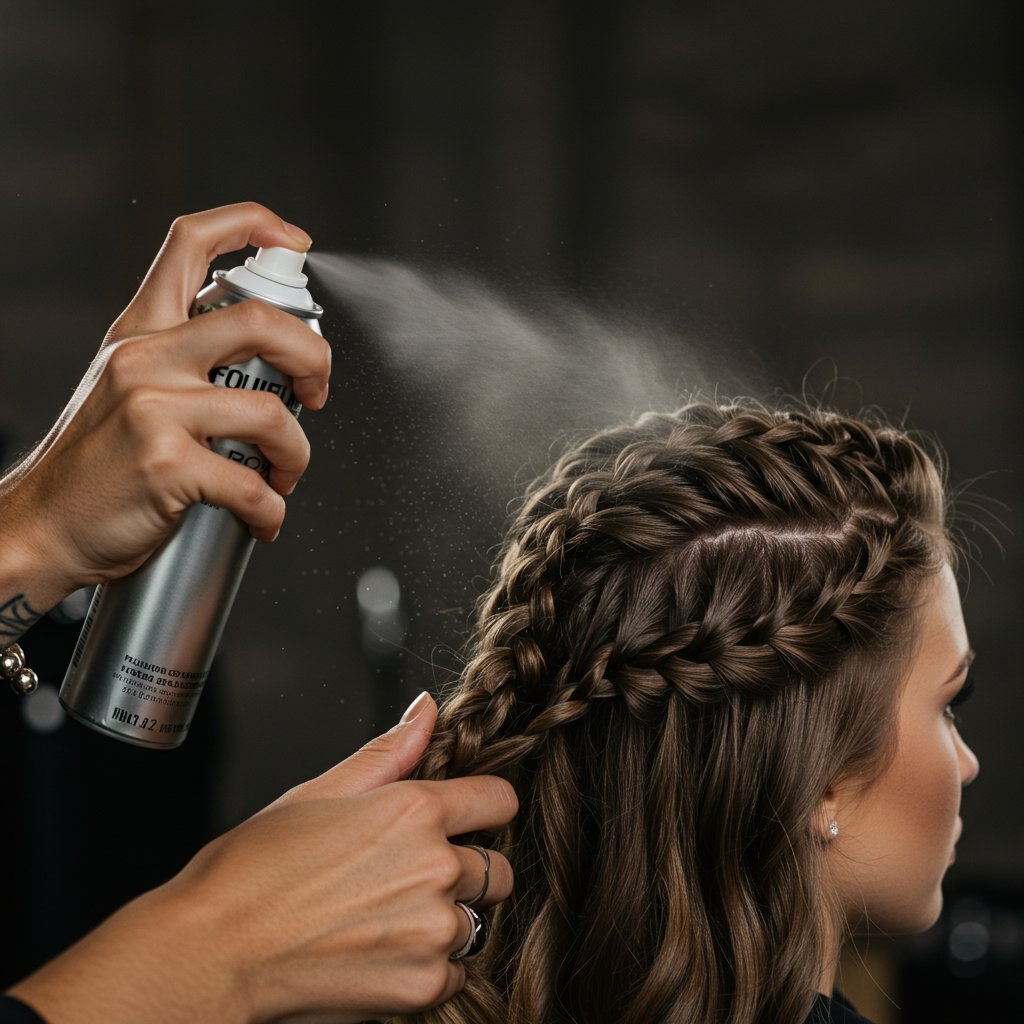
First, product is paramount. Starting with a texturizing spray or a light mousse on dry hair provides the foundation for grip and hold. Second, when you are first weaving the braid, make it slightly tighter than you ultimately want it to be. This gives you room to pancake and loosen the style for the desired aesthetic without sacrificing its structural integrity. Third, finish your style with a purposeful spritz of a medium to strong-hold hairspray. Hold the can about 8-10 inches away and mist it over the braid to lock everything in place and combat humidity-induced frizz. For sleeping, a silk or satin pillowcase reduces friction, or you can wrap your braided hair in a silk scarf to protect it overnight.
Frequently Asked Questions (FAQ) About Braiding
Q1: Which of these three braids is the easiest for a total beginner?
While it varies by person, many find the Fishtail braid to be the simplest to learn conceptually because it only involves managing two main sections of hair. The back-and-forth motion can be easier to master than the three-strand coordination required for Dutch and Waterfall braids.
Q2: Can I do these braids on short or medium-length hair?
The Waterfall braid is excellent for shorter hair, as it works across the head as an accent rather than requiring significant length. Dutch braids can be done on shorter hair (like a Dutch-braided fringe), but they can be tricky. Fishtail braids generally require at least shoulder-length hair to have enough length to work with and look substantial.Q3: How do I make my fine hair look fuller and thicker in a braid?
The key is to create the illusion of volume. Start by applying a texturizing powder or dry shampoo at the roots and through the lengths. After you've completed and secured your braid, generously "pancake" it by gently pulling the edges of each plait apart. This can visually double the size of your braid.Q4: What's the main difference between a Dutch braid and a French braid?
It's all in the direction of the weave. In a French braid, you cross the outer strands over the middle strand. In a Dutch braid, you cross the outer strands under the middle strand. This simple change is what makes the Dutch braid pop up from the head, while the French braid lies flat.Q5: How long should it take to learn these braiding techniques?
Patience and practice are everything. It might take several attempts to get the muscle memory down for each style. Plan to spend 15-20 minutes per practice session. You might get the hang of a fishtail in a day, while the Dutch or Waterfall could take a week of consistent practice. Don't give up!Q6: When should I see a professional stylist for braiding?
While DIY braiding is a fantastic skill, there are times when a professional touch is invaluable. For major events like weddings or galas, a stylist can create a flawless, intricate, and incredibly long-lasting style. They are also experts at braiding on all hair types and can create complex looks that combine multiple braiding techniques that may be too difficult to do on your own head.Conclusion: Weave Your Way to Hair Confidence
Learning to braid is like learning a new language for your hair—it opens up a world of creative expression and styling possibilities. By starting with the Fishtail, Dutch, and Waterfall techniques, you've built a versatile foundation that can be adapted, combined, and personalized. Remember that every expert was once a novice, and the key to beautiful braids is consistent practice and patience. Don't be afraid to experiment, to make mistakes, and to find what works best for your hair type and personal style.
As you grow more confident, you'll begin to see these braids not just as hairstyles, but as accessories that can complete any outfit. They are practical for keeping hair out of your face, yet sophisticated enough for the most formal occasions. Embrace the process, enjoy the creativity, and wear your braided creations with pride. And for those moments when you envision a truly spectacular, intricate style for a milestone event, remember that the expertise of a professional stylist is always available to bring your ultimate hair dreams to life.


