From Install to Aftercare: Mastering Your Knotless Braids | The Ultimate 2025 Guide
The Art and Science of Perfect Knotless Braids
Knotless braids have revolutionized the world of protective styling, offering a chic, versatile look without the tension and discomfort often associated with traditional box braids. Their seamless, natural-looking start, created by feeding hair in gradually, has made them a go-to choice for promoting hair health while looking effortlessly stylish. However, achieving and maintaining flawless knotless braids goes far beyond the salon chair. It's a comprehensive process that begins with careful preparation and extends through diligent aftercare and a safe takedown.

This ultimate guide is your roadmap to mastering every stage of the knotless braids journey. We'll explore the critical steps for preparing your natural hair, what to expect during a professional installation, and the detailed aftercare routines that will keep your style fresh and your hair underneath healthy and thriving. Whether you're a seasoned braid enthusiast or considering knotless braids for the first time, understanding the full lifecycle is key to maximizing the beauty and benefits of this incredible protective style.
From selecting the right size and length to washing your braids without causing frizz and knowing the perfect time for removal, this post covers it all. Prepare to unlock the secrets to a longer-lasting, healthier, and more beautiful knotless braid experience that protects your natural hair and turns heads for all the right reasons.
The Foundation: Pre-Installation Prep for Flawless Braids
A stunning set of knotless braids begins long before you sit in the stylist's chair. The health and preparation of your natural hair serve as the foundation for the entire style. Neglecting this crucial first step can lead to breakage, scalp irritation, and a shorter lifespan for your braids. A clean, moisturized, and properly stretched canvas allows your stylist to work efficiently and ensures your hair is in its best possible condition to be tucked away.
Step 1: Deep Cleansing and Clarifying
Start with a thorough wash using a clarifying shampoo. This is essential to remove any product buildup, dirt, or oils from your hair and scalp. A clean scalp is less likely to become itchy and irritated once the braids are installed. Follow the clarifying shampoo with a moisturizing, sulfate-free shampoo to replenish hydration without stripping your hair of its natural oils. Focus on massaging your scalp with the pads of your fingers to stimulate blood flow and ensure it's completely clean.Step 2: Intense Hydration and Deep Conditioning
After cleansing, it's time to infuse your hair with maximum moisture. This is arguably the most important prep step. Apply a rich, deep conditioner or hair masque, focusing on your ends, which are the oldest and most fragile parts of your hair. For an intensive treatment, cover your hair with a plastic cap and sit under a hooded dryer or steamer for 20-30 minutes. The heat helps the conditioner penetrate the hair shaft more effectively. This deep hydration treatment fortifies your hair, improves elasticity, and prepares it to be styled, minimizing the risk of breakage during the braiding process.Step 3: Detangling and Stretching the Hair
Once your hair is conditioned and rinsed, it's time to detangle and stretch it. Working in sections, apply a leave-in conditioner with good slip and gently detangle from the ends up to the roots using your fingers or a wide-tooth comb. After detangling, properly stretching your hair is vital. It makes the parting and braiding process smoother for your stylist and prevents tangles and knots within the braids. You can achieve this by blow-drying with a comb attachment on low to medium heat or by using heatless methods like banding, African threading, or large braids/twists left to air dry overnight.Choosing Your Style: Size, Length, and Hair Selection
The versatility of knotless braids is one of their biggest draws, but the wide array of options can be overwhelming. The size, length, and type of braiding hair you choose will dramatically affect the final look, the installation time, the weight on your scalp, and the overall maintenance required. Making an informed decision in consultation with your stylist is key to ensuring your braids align with your lifestyle and hair goals.
Small vs. Medium vs. Jumbo Knotless Braids
Size is a critical factor. Small knotless braids offer a fuller, more voluminous look and tend to last longer, but they take significantly more time to install and can be heavier if not properly proportioned. Jumbo knotless braids are quick to install and create a bold, dramatic statement, but they may not last as long and can place more tension on larger sections of hair if not installed correctly. Medium knotless braids are often the perfect middle ground, offering a balanced look with reasonable installation time and good longevity. Consider your hair density: finer hair may benefit from medium or large parts to minimize stress, while denser hair can handle smaller sizes.Length Considerations: From Bob to Waist-Length
Length is all about personal preference and lifestyle. A chic, shoulder-length bob is lightweight and easy to manage, making it perfect for active individuals or warmer climates. Mid-back or waist-length braids provide endless styling possibilities and a glamorous look but come with added weight and require more maintenance, especially during washing and sleeping. When choosing your length, think about your daily activities, how you plan to style your hair, and your tolerance for the weight of the extensions.Selecting the Right Braiding Hair
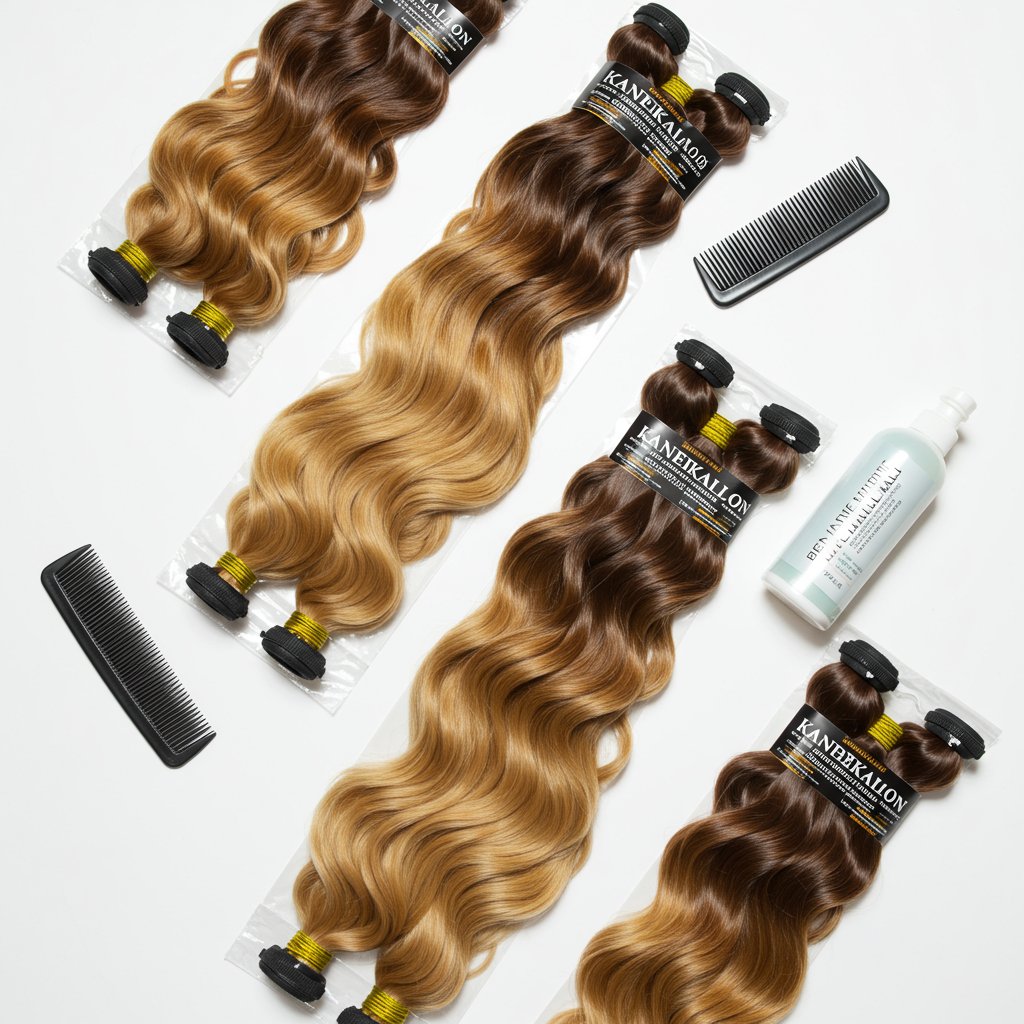
The quality of the braiding hair you use is non-negotiable. For the classic silky look, high-quality, pre-stretched synthetic Kanekalon hair is the industry standard. It's lightweight, easy to work with, and seals well with hot water. Look for brands known for being hypoallergenic to avoid scalp irritation. For a more natural, textured look, or for those who want the ability to curl their ends with heat, human hair or human hair blends are an excellent, albeit more expensive, option. Always purchase more hair than you think you'll need to avoid running out mid-installation.The Installation: What to Expect from a Professional
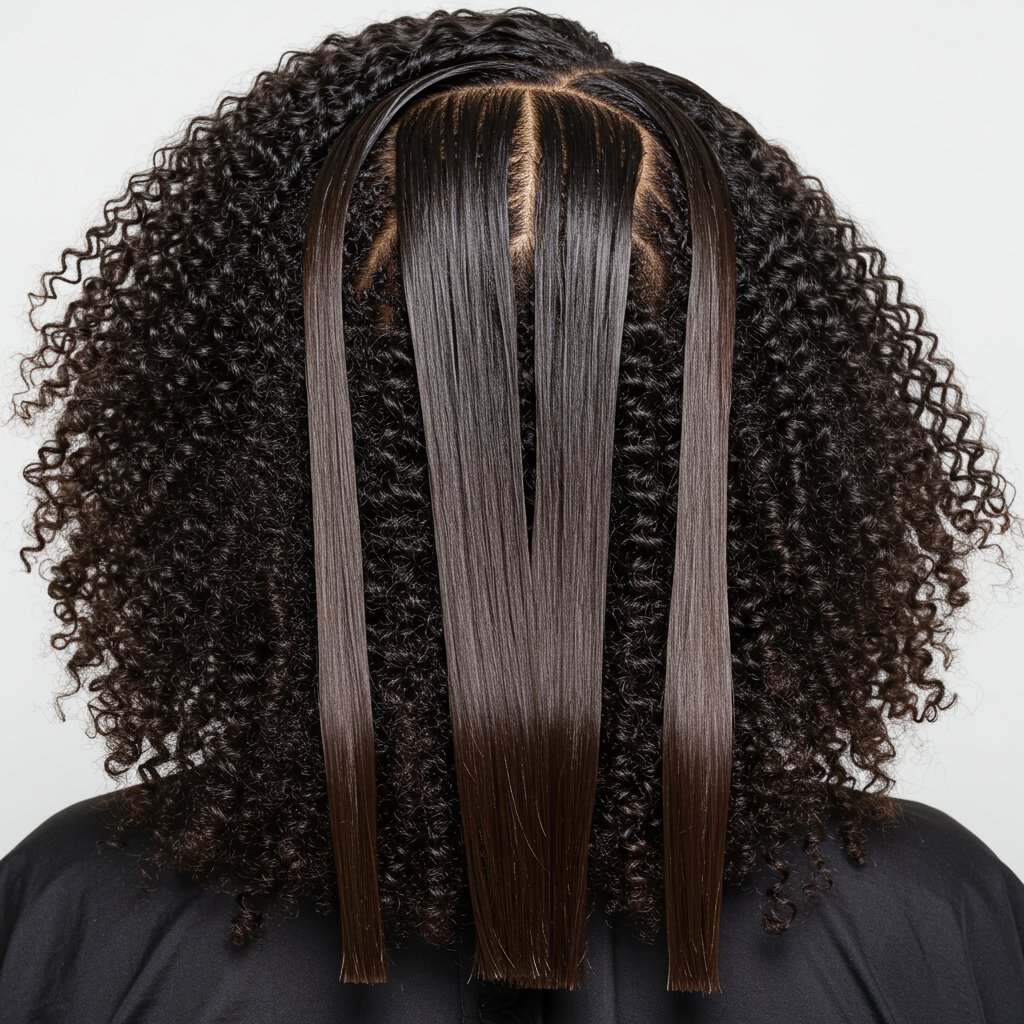
The magic of knotless braids lies in the installation technique. Unlike traditional box braids that start with a knot at the base, the knotless method involves a seamless feed-in process. This is what makes the style tension-free, flexible from day one, and gentler on the scalp and edges. Understanding this process helps you appreciate the skill involved and ensures you're receiving a high-quality, professional service that prioritizes the health of your hair.
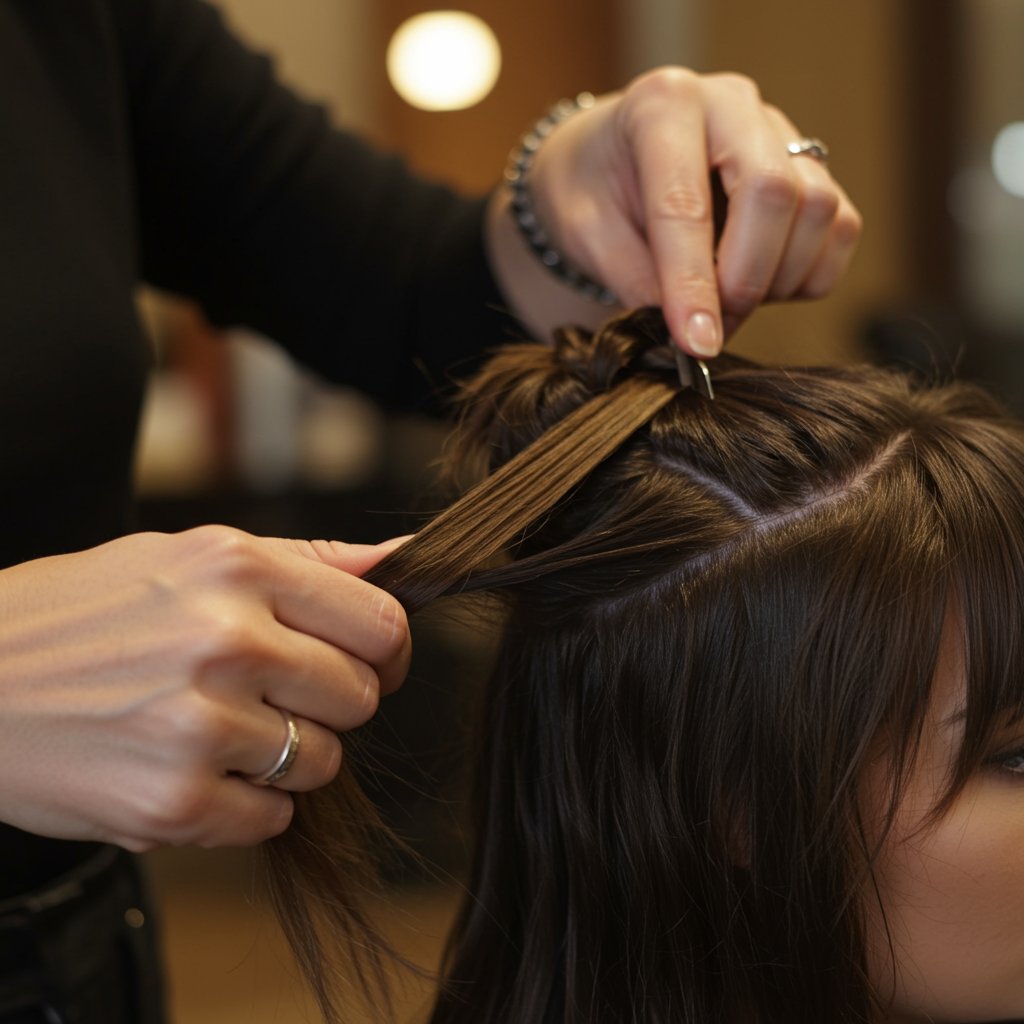
Parting Precision: The Blueprint of Your Style
A great knotless braid installation starts with impeccable parting. Your stylist will map out a grid on your scalp—be it square, triangular, or free-form parts—that will serve as the blueprint for the entire style. The parts should be clean, consistent, and sized appropriately for the desired braid size. This meticulous attention to detail not only creates a neat and polished final look but also ensures that hair is evenly distributed, preventing any single section from bearing too much weight or tension.The Feed-In Technique: Building a Tension-Free Braid
This is the core of the knotless method. Your stylist will start the braid with just your natural hair. Then, as they braid down, they will begin to incrementally 'feed in' small pieces of braiding hair. This gradual addition of hair builds the braid's thickness and length without creating a bulky, tight knot at the root. The result is a braid that lays flat against the scalp and can be styled with immediate flexibility. This technique requires significant skill and patience to ensure each braid has consistent tension and a seamless transition from natural hair to extension.Sealing the Ends
Once the braids are complete, the ends must be sealed to prevent unraveling. The most common method is dipping the ends in hot water, which smooths and seals the synthetic fibers. Your stylist will be careful to use water that is hot but not boiling and to protect your skin. Other options, depending on the hair used, include burning the ends (which should only be done by a very experienced professional) or using small rubber bands for certain styles. For human hair braids, the ends can be left loose, curled with rods, or braided to the very tip.The First 48 Hours: Crucial Post-Installation Care
Even though knotless braids are designed to be tension-free, the first two days after installation are a critical adjustment period for your scalp. Your follicles are adapting to the new weight and manipulation, and how you treat your hair during this time can set the tone for the entire duration of the style. The goal is to minimize any potential stress and allow your scalp to settle comfortably.
Proper care in the initial 48 hours is simple but vital. Avoid intricate or tight updos like high ponytails or buns. These styles pull on the roots and can create the very tension you sought to avoid with knotless braids. Instead, let your braids hang freely or style them in a loose, low ponytail. This gives your scalp the breathing room it needs. If you feel any minor discomfort or tightness, a gentle scalp massage or a light spritz of a soothing spray containing ingredients like aloe vera or tea tree oil can provide relief.
During this period, also be mindful of your edges. Don't apply heavy gels or edge controls that can clog pores and create tension. A light touch is best. At night, ensure you are protecting your new style with a silk or satin scarf or bonnet. This initial gentle care prevents inflammation, protects your edges, and ensures your knotless braid journey starts on the right foot.
Daily and Weekly Aftercare for Longevity
To keep your knotless braids looking salon-fresh and to maintain the health of your hair underneath, a consistent aftercare routine is essential. This regimen doesn't need to be complicated, but it does need to be regular. It revolves around three key pillars: moisture, scalp health, and nightly protection.
Morning Refresh: Reviving Your Braids
In the morning, your braids may have a bit of 'bed head.' To revive them, gently shake them out. If they feel dry, lightly mist them with a hydrating spray. A simple DIY mix of water, a few drops of a natural oil like jojoba or almond oil, and a bit of leave-in conditioner in a spray bottle works wonders. Focus the mist on the length of the braids, not directly on the scalp, to avoid product buildup. To tame any flyaways or frizz, you can smooth a light, alcohol-free mousse over the braids and tie them down with a satin scarf for about 15-20 minutes while you get ready.Scalp Health is Wealth: Cleansing and Moisturizing
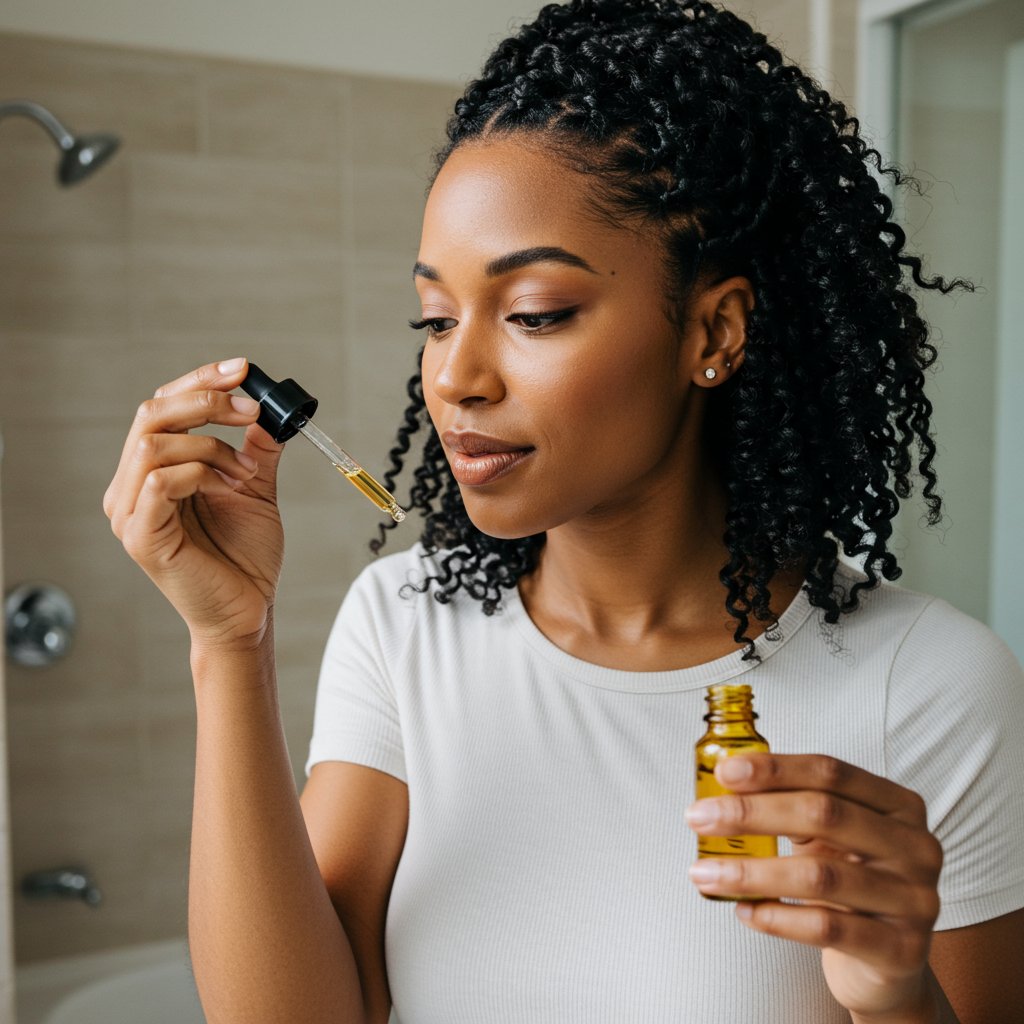
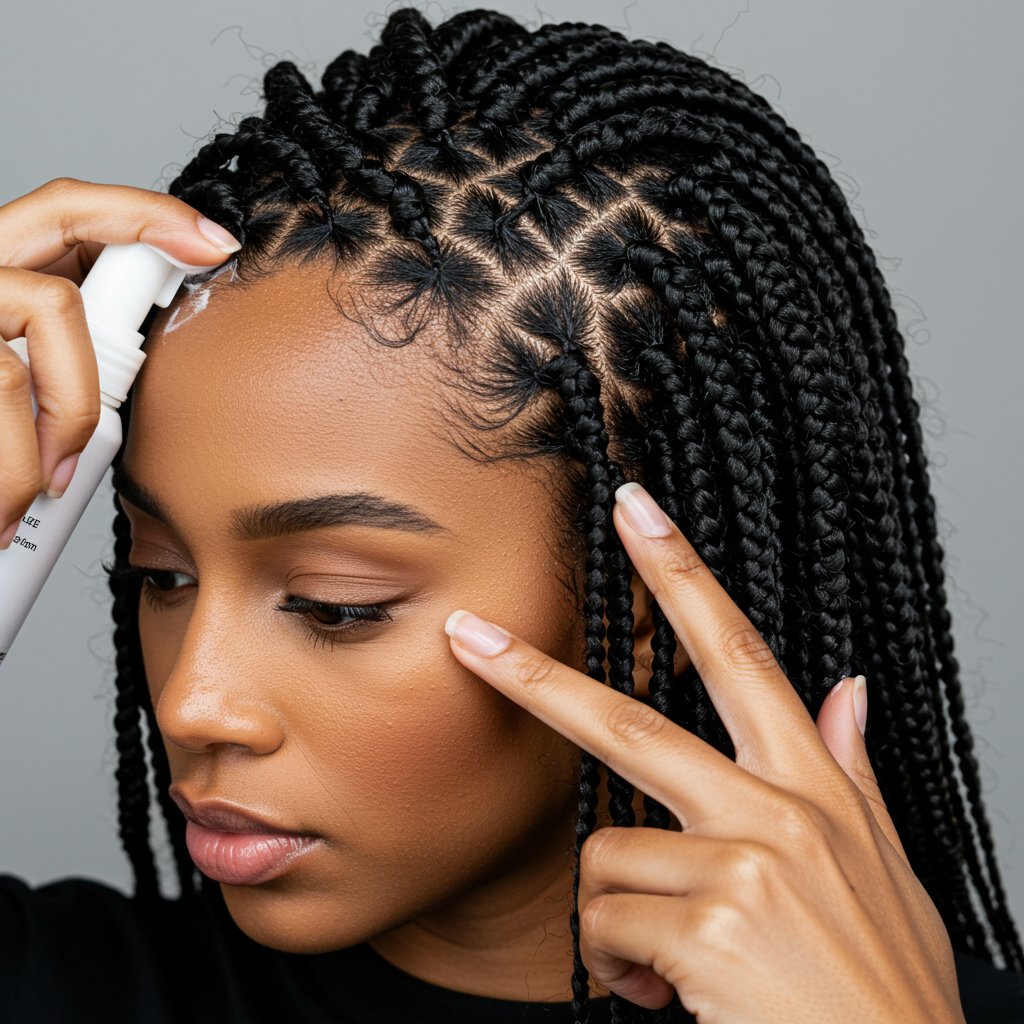
A healthy scalp is the foundation of healthy hair growth. Every 2-3 days, apply a lightweight, nourishing oil directly to your scalp using a bottle with a nozzle tip for precise application. Oils like jojoba, grapeseed, or a specially formulated scalp oil can soothe itching, reduce dryness, and nourish your follicles. Gently massage the oil in with the pads of your fingers to stimulate blood flow. In between washes, you can use a cloth or cotton pad with a bit of witch hazel or sea breeze to gently wipe your parts and remove any surface buildup, keeping your scalp feeling clean and refreshed.Nightly Protection: The Power of Silk and Satin
This is a non-negotiable step. Protecting your braids at night is the single most effective way to prevent frizz, preserve neatness, and retain moisture. Gather your braids into a loose, high ponytail or bun on top of your head (the 'pineapple' method) and secure them with a large silk or satin scarf or bonnet. If you have very long braids, a long bonnet or braid sock is an excellent investment. This prevents the braids from rubbing against cotton pillowcases, which can cause friction, snagging, and moisture loss.Washing Knotless Braids Without Causing Frizz
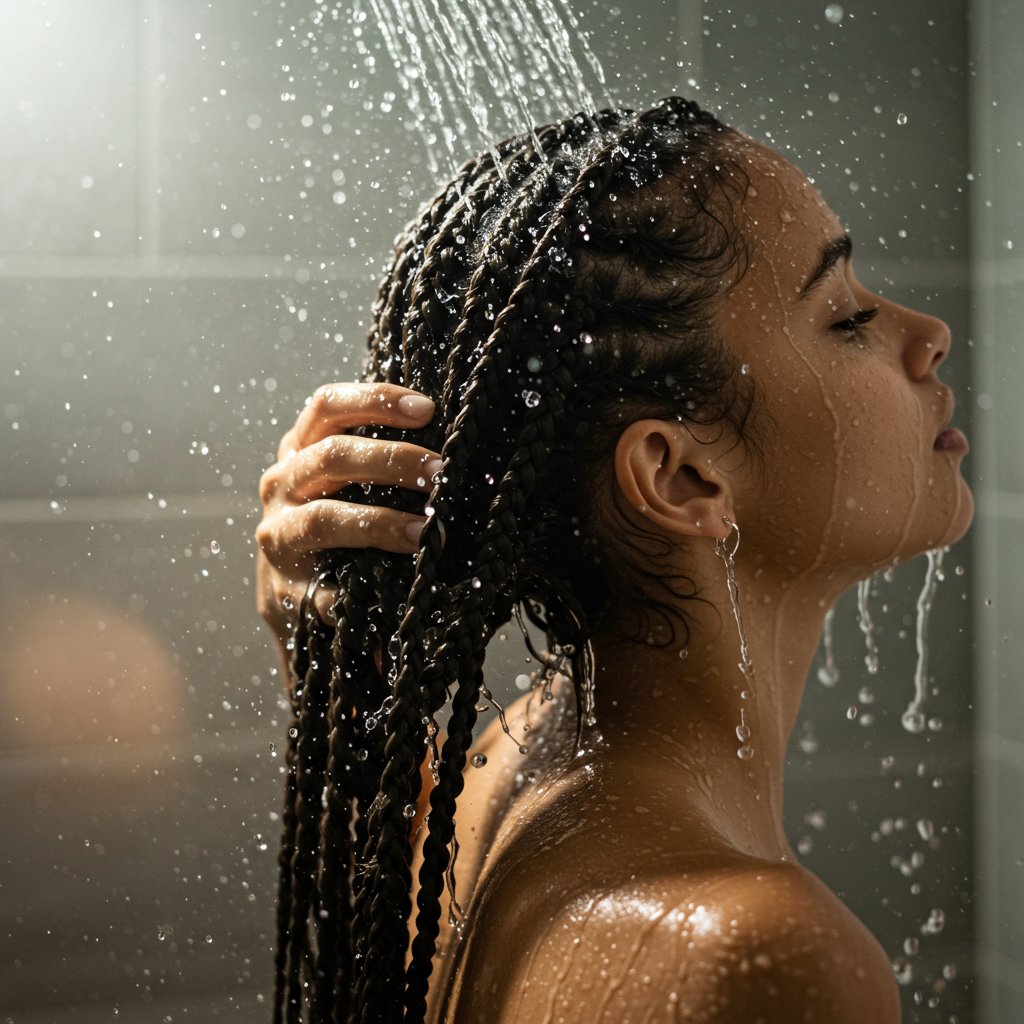
Washing your braids is crucial for scalp health and hygiene, but many people avoid it for fear of creating a frizzy, messy look. With the right technique, you can effectively cleanse your scalp and hair without disrupting your style. Plan to wash your knotless braids every 2-3 weeks to remove buildup, sweat, and environmental debris.
Step 1: Prepping for the Wash
Before you even get in the shower, prepare your cleansing mixture. Dilute your favorite sulfate-free shampoo with water in an applicator bottle with a nozzle tip. This allows you to apply the cleanser directly to your scalp where it's needed most, without roughing up the braids themselves. Section your braids into 4-6 large, loose twists and secure them with clips. This helps with manageability and prevents the braids from tangling during the wash.Step 2: The Washing Technique
Focus all your attention on the scalp. Apply the diluted shampoo directly to your parts and gently massage your scalp with the pads of your fingertips. Do not scrub vigorously or bunch up your braids. Let the suds run down the length of the braids—this is usually enough to cleanse the extensions. Rinse thoroughly, allowing the water to run down the length of your sectioned twists. If needed, you can follow up with a diluted conditioner, focusing again on the scalp and letting it rinse down the braids.Step 3: Drying Your Braids Properly
Proper drying is essential to prevent your braids from smelling of mildew. After rinsing, gently squeeze the excess water out of each section. Do not rub them with a towel. Instead, wrap your head in a highly absorbent microfiber towel or an old t-shirt for about 20-30 minutes to soak up as much water as possible. Afterwards, let your braids air dry completely. This can take several hours, so it's best to wash them in the morning. To lock in moisture and add shine, you can apply a light oil to your scalp and a bit of mousse to the braids once they are about 80% dry.Extending Your Style: Touch-Ups and Maintenance
While knotless braids are a long-term protective style, they don't look brand new forever. After a few weeks, you'll notice new growth, and the hair around your hairline may start to look fuzzy. A professional touch-up can be a fantastic way to extend the life of your style for another couple of weeks, saving you the time and expense of a full re-installation.
When to Get a Touch-Up
A touch-up is typically recommended around the 4-week mark. This is when new growth is visible but not yet excessive. A touch-up focuses on the most visible parts of your hair: the front hairline (edges) and sometimes the main parts in the front section of your head. An experienced stylist will carefully take down the braids in these areas, prep the natural hair, and reinstall them to blend seamlessly with the rest of the style.DIY Frizz Control
Between salon visits, you can manage frizz and maintain a sleek look at home. The most popular method is using a setting foam or mousse. Apply a generous amount of mousse to your braids, paying special attention to the roots and any frizzy areas. Then, tie a silk or satin scarf firmly over your hair for at least 30 minutes (or even overnight) until the mousse is completely dry. When you remove the scarf, your new growth will be laid down, and your braids will look significantly neater and more refreshed. This simple trick can make your style look a week younger.The Takedown: Safely Removing Your Braids
All good things must come to an end, and knowing when and how to properly remove your knotless braids is just as important as the installation and maintenance. Keeping braids in for too long (typically beyond 8 weeks) can lead to matting at the roots, excessive product buildup, and potential breakage. A safe, patient takedown process is your final act of care for the hair you've been protecting.
Step 1: Cut with Caution
Start by cutting the end of each braid. Be conservative with your cut—it's always better to cut too little than too much. Snip the braid a couple of inches below where you estimate your natural hair ends. This gives you a clear starting point for unraveling and significantly speeds up the process.Step 2: Gentle Unraveling
Once the ends are trimmed, begin to gently unbraid each braid. You can use a rat-tail comb to help get the process started. As you unravel, you'll encounter the point where the extension was fed in. Be gentle here. If your hair was properly moisturized before installation, the braids should come out relatively easily. It's helpful to apply a bit of oil or a detangling product to your fingers to add slip as you go.Step 3: Detangling the Buildup
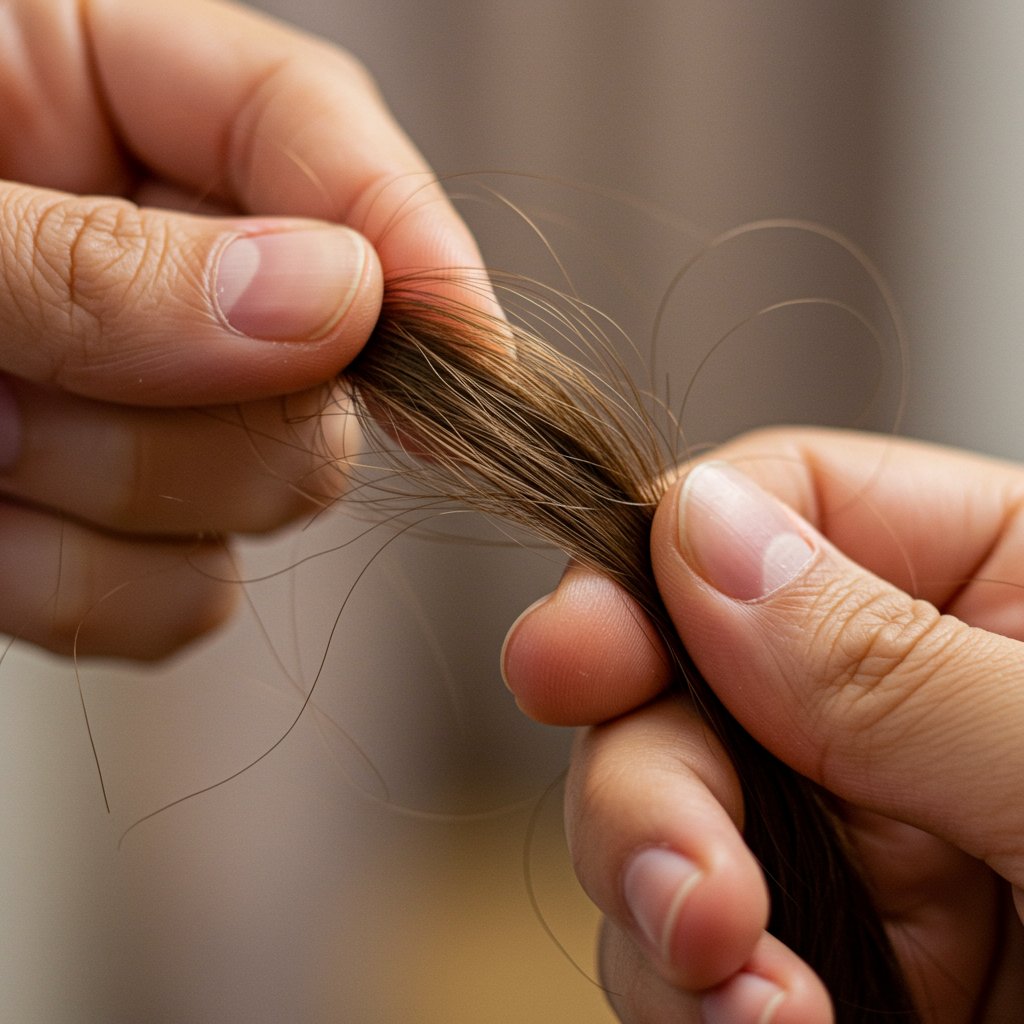
As you take down each braid, you will notice a collection of shed hair at the base. This is completely normal! We naturally shed 50-100 hairs per day, and since your hair has been in braids, that hair has had nowhere to go. Before moving to the next braid, gently separate this shed hair from the new growth to prevent it from tangling with neighboring sections. Once all braids are out, do not immediately wash your hair. First, saturate your hair in sections with a detangling product or conditioner mixed with oil and slowly, patiently, detangle each section from the ends to the roots with your fingers, followed by a wide-tooth comb. This pre-poo detangling step is the most critical part of preventing breakage during your first wash post-braids.Pro Tips for Mastering Your Knotless Braids
- Communicate with Your Stylist: Be clear about any scalp sensitivities or hair concerns. A good stylist can adjust their technique or product choices for you.
- Don't Sacrifice Your Edges: If you feel any pulling or pain, especially around your hairline, speak up immediately. Your protective style should never be painful.
- Listen to Your Hair: The recommended 4-8 week duration is a guideline. If your scalp is excessively itchy, your hair feels dry, or you have a lot of new growth, it might be time to take them down sooner.
- Sun Protection is Real: If you'll be in the sun for extended periods, your scalp can get sunburned. Wear a hat or use a UV-protectant spray for your scalp and hair.
- Embrace Versatility: One of the best things about knotless braids is their flexibility. Experiment with different styles, but always be gentle and avoid creating tension at the root.
Frequently Asked Questions (FAQ)
Q: How long do knotless braids typically last?
A: With proper care and maintenance, knotless braids can last between 4 to 8 weeks. It's generally not recommended to keep them in longer than 8 weeks to prevent matting and allow your natural hair to rest.Q: Are knotless braids damaging to your hair?
A: When installed and maintained correctly, knotless braids are one of the least damaging protective styles. Because they start without a tight knot, they place significantly less tension on the scalp and edges. Damage typically occurs if they are installed too tightly, left in for too long, or removed improperly.Q: Can I get knotless braids on fine or thin hair?
A: Yes, knotless braids can be a great option for those with finer hair because they are lightweight and tension-free. It's crucial to opt for medium or larger parts and to not add too much braiding hair to avoid weighing down the natural hair.Q: How much do knotless braids typically cost?
A: The cost varies widely based on your location, the stylist's experience, and the size and length of the braids you choose. Generally, you can expect to pay anywhere from $150 to $600+. The longer installation time and skill required often make them more expensive than traditional box braids.Q: What's the main difference between knotless and traditional box braids?
A: The key difference is the installation method. Traditional box braids start by creating a small knot at the base of the scalp with the braiding hair. Knotless braids start with your natural hair and gradually feed in the extension, creating a flatter, more seamless, and tension-free beginning.Q: How do I stop my scalp from itching with braids?
A: Itching is often caused by a dry scalp, product buildup, or a reaction to the braiding hair. To prevent it, ensure your scalp is clean and moisturized before installation. After installation, regularly apply a soothing scalp oil with tea tree or peppermint oil, and cleanse your scalp every 2-3 weeks. If you're sensitive, rinsing the braiding hair in an apple cider vinegar solution before installation can remove alkaline coatings that cause irritation.Conclusion: Embrace the Braid, Protect the Hair
Mastering your knotless braids is a journey of intentional care that honors the health of your natural hair. From the foundational prep work to the final, gentle takedown, each step plays a vital role in the success and longevity of your protective style. By investing time in understanding the process and committing to a consistent aftercare routine, you transform your braids from a temporary look into a true protective measure that fosters growth and maintains hair health.
Remember that while knotless braids are a low-maintenance style, they are not a no-maintenance style. The health of your scalp and the hair beneath the braids should always be the top priority. Armed with this comprehensive guide, you are now equipped to confidently navigate every phase of your knotless braid experience, ensuring your hair not only looks stunning but also remains strong, moisturized, and thriving underneath. When you're ready for your next protective style, seek out an experienced professional who prioritizes hair health to bring your vision to life.


