Get the Look: The Ultimate Beginner's Guide to Knotless Braids | Everything You Need to Know
Your Introduction to the World of Knotless Braids
In the ever-evolving world of hair styling, one trend has firmly established itself as more than just a fleeting fashion moment: knotless braids. Celebrated for their chic appearance, comfort, and scalp-friendly benefits, they have become the go-to protective style for countless individuals. Unlike traditional box braids that start with a small, tight knot at the base, knotless braids begin with your natural hair and gradually feed in braiding extensions. This technique creates a seamless, flat transition from your scalp, resulting in a look that is not only stunningly natural but also significantly gentler on your hair follicles.

This guide is designed for anyone curious about making the switch to this revolutionary style. Whether you're a braiding veteran looking for a less strenuous option or a complete newcomer to protective styling, you've come to the right place. We will delve deep into what makes knotless braids unique, explore their numerous benefits, and walk you through every step of the journey—from preparing your natural hair for installation to maintaining your beautiful new look and ensuring a safe removal process. Get ready to discover why knotless braids are celebrated for their beauty, versatility, and hair health advantages.
What Exactly Are Knotless Braids? The Modern Twist on a Classic Style
To truly appreciate knotless braids, it's essential to understand how they differ from their predecessors, particularly traditional box braids. The key distinction lies entirely in the installation technique. Traditional box braids are created by wrapping a piece of braiding hair around a section of your natural hair at the very root, forming a small but firm knot. This knot serves as the anchor for the braid. While effective for securing the extension, this method can create significant tension on the scalp, leading to discomfort, potential hair follicle damage (traction alopecia), and a less flexible, often raised appearance at the root.
Knotless braids, on the other hand, employ the 'feed-in' method. The stylist begins by braiding a small section of your natural hair first. Then, small pieces of braiding hair are gradually and seamlessly fed into the braid as it moves down the hair shaft. This process eliminates the initial tension-filled knot, allowing the braid to lay flat against the scalp from the very beginning. The result is a more organic, natural-looking style that flows beautifully and feels incredibly lightweight. This innovative approach not only protects your edges and scalp but also provides immediate flexibility, allowing you to style your braids in a high ponytail or bun right after your appointment without the usual pain or stiffness.
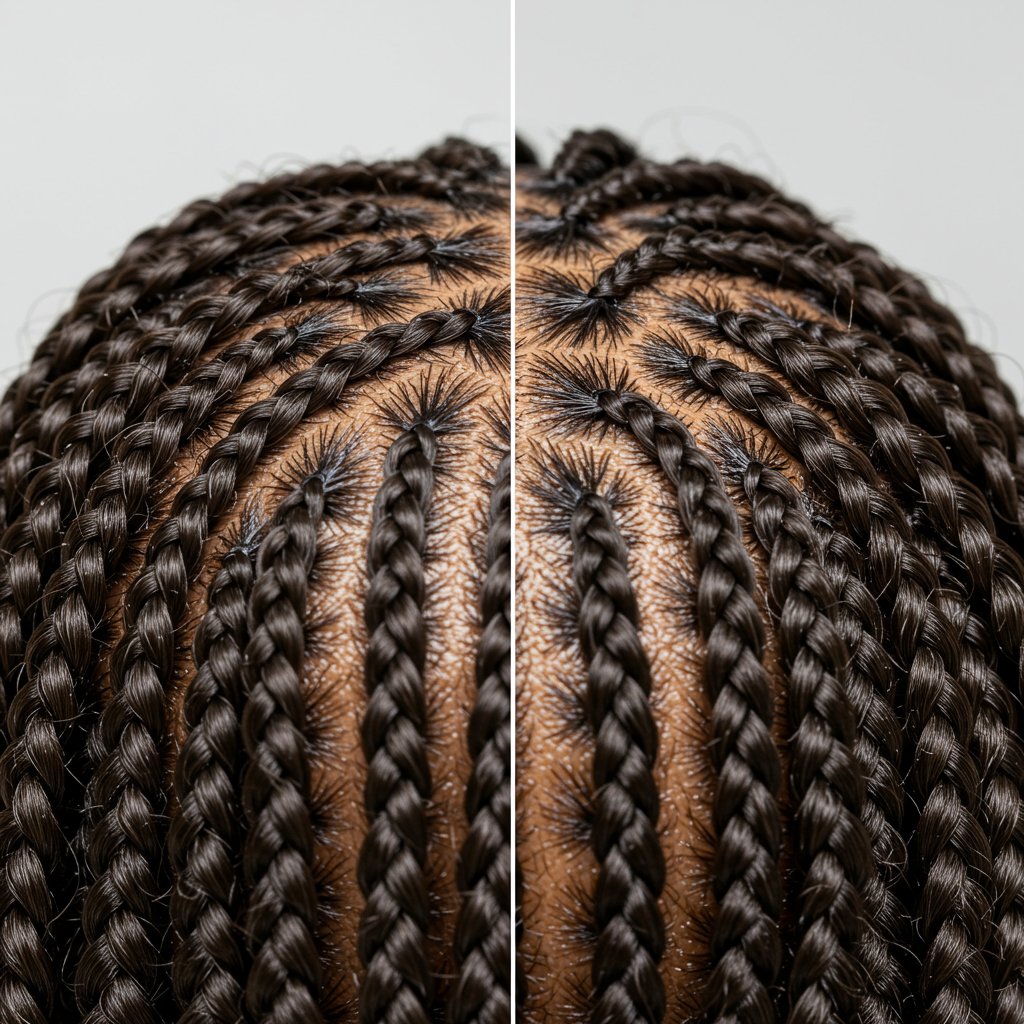
Knot vs. Feed-In: A Visual and Sensorial Difference
The difference is not just technical; it's something you can see and feel. Visually, knotless braids offer a smoother, more discreet origin point. The braid appears to grow directly from the scalp, offering a sophisticated and polished finish. From a sensory perspective, the lack of a bulky knot means less pulling and strain. Clients often report a dramatic reduction in scalp sensitivity and headaches compared to traditional methods. This focus on hair health and comfort, combined with a flawless aesthetic, is precisely why the knotless technique has gained such immense popularity among stylists and clients alike.
The Unbeatable Benefits of Choosing Knotless Braids
The buzz surrounding knotless braids isn't just hype; it's backed by a host of tangible benefits for your hair, scalp, and overall comfort. Opting for this style is an investment in both beauty and well-being. The gentle installation process sets the stage for a healthier and more enjoyable protective styling experience from start to finish.

Less Tension, Healthier Scalp
This is arguably the most significant advantage. By eliminating the initial knot, the knotless method drastically reduces the tension placed on your hair follicles. This is crucial for preventing traction alopecia, a form of hair loss caused by constant pulling. With less strain on your roots, your scalp can breathe, and your delicate edges are preserved. This makes knotless braids an excellent choice for those with sensitive scalps or finer hair who may have found traditional braids too harsh in the past.Natural-Looking and Flat at the Root
The seamless start of a knotless braid provides a look that is unmatched in its natural appearance. The braids lay flat and move more freely, mimicking the way your own hair would fall. This sleek, undetectable base makes the style look less like extensions and more like an extension of you. The flat lay also contributes to a less bulky finish, especially when the braids are gathered into updos or other styles.Lightweight and Comfortable
Without the dense knots at the base of each braid, the overall style feels significantly lighter. This reduced weight adds to the comfort, making it easier to wear the style for extended periods. Many people find they can sleep more comfortably and experience less of the 'heavy head' feeling that can sometimes accompany large volumes of braided extensions. The immediate flexibility means you can style your hair up or down from day one without waiting for the braids to 'loosen up.'Preparing Your Hair for a Flawless Installation
Achieving the perfect set of knotless braids begins long before you sit in the stylist's chair. Proper preparation of your natural hair is the foundation for a beautiful, long-lasting style and is critical for maintaining your hair's health underneath. Neglecting these steps can lead to dryness, breakage, and a less-than-ideal final result. A professional stylist will always appreciate a client who arrives with their hair properly prepped and ready for braiding.
Deep Cleansing and Clarifying
Start with a clean slate. It's essential to wash your hair thoroughly with a clarifying shampoo to remove any product buildup, dirt, or oils. A clean scalp promotes healthy hair growth and prevents itchiness under your braids. Focus the shampoo on your scalp and allow the suds to run down your hair strands. Follow up with a moisturizing shampoo to replenish any stripped moisture, ensuring your hair is clean but not dry.Intense Hydration and Deep Conditioning
After cleansing, the next step is to infuse your hair with as much moisture as possible. This is your last chance to deeply hydrate your strands before they are enclosed in braids for several weeks. Apply a rich, deep conditioner or hair mask, focusing on your ends. For maximum absorption, cover your hair with a plastic cap and sit under a hooded dryer or steamer for 20-30 minutes. This step is non-negotiable; well-moisturized hair is more pliable, less prone to breakage during braiding, and will remain healthier throughout the life of the style.Detangling and Stretching/Blowing Out
For a smooth and seamless installation, your hair must be thoroughly detangled and stretched. After rinsing out your deep conditioner, apply a leave-in conditioner and a heat protectant. Gently detangle your hair, starting from the ends and working your way up to the roots, using a wide-tooth comb or your fingers. To achieve the necessary stretched state, most stylists prefer clients to arrive with their hair blow-dried. A proper blowout makes parting easier, reduces tangles during the braiding process, and helps the final style look sleeker. If you're averse to heat, you can achieve a stretched look through heatless methods like banding or African threading, but a blowout is often the gold standard for this style's prep.The Knotless Braid Installation Process: What to Expect
Understanding the installation process can help demystify the experience and set clear expectations for your salon visit. While it's a meticulous and often lengthy process, the technique itself is elegant and focused on precision. A skilled braider makes it look effortless, but each step is deliberate to ensure a flawless, comfortable, and secure result.

Step 1: Precision Parting
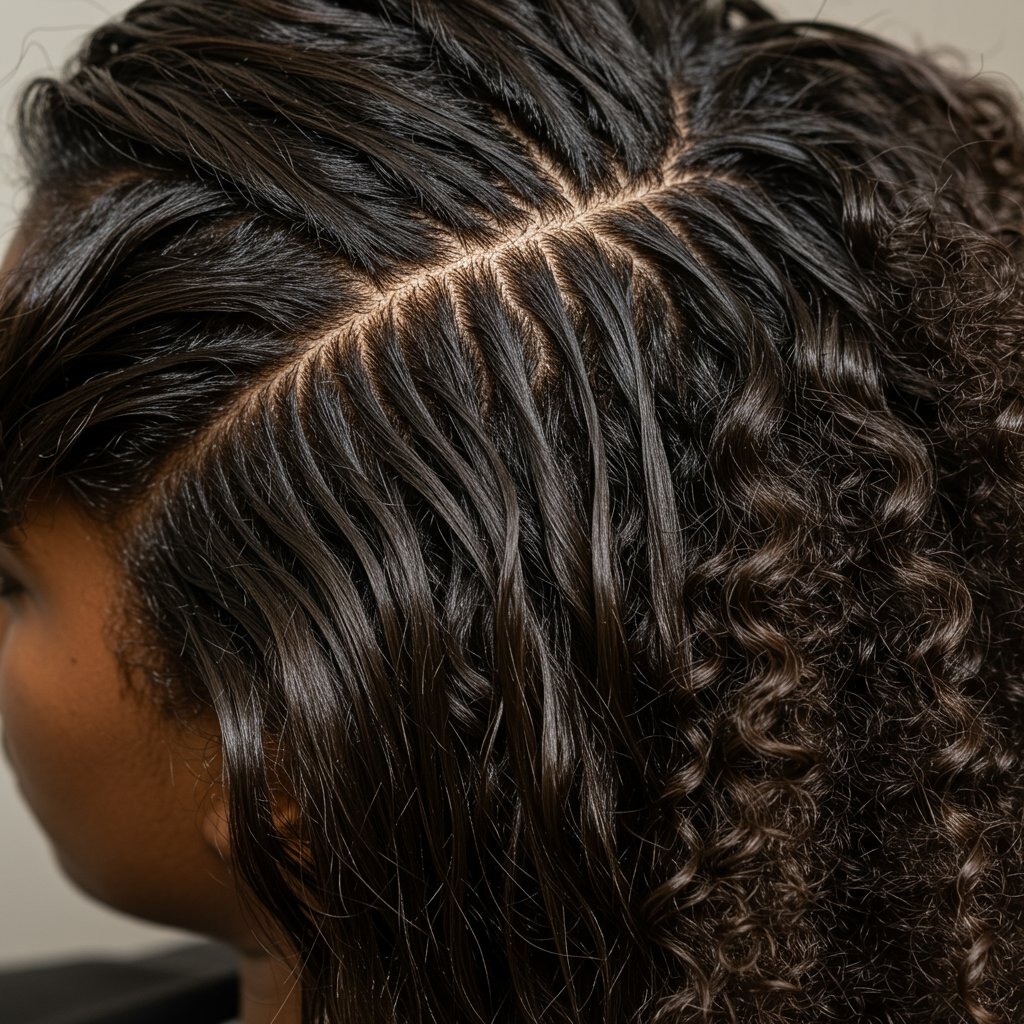
Your stylist will begin by parting your clean, stretched hair into a neat grid. The size of the boxes in the grid will determine the size of your braids—small, medium, or large. The pattern can be classic squares, triangles, or even more creative, free-form parts. Clean, sharp parts are the hallmark of a professional job and are essential for a polished final look. A good stylist will use a quality parting comb and a light gel or edge control to make the lines crisp.Step 2: The Feed-In Technique
The magic of knotless braids happens here. Your stylist will take a section of your natural hair and begin a simple three-strand braid. After the first one or two passes, they will start adding small pieces of pre-stretched braiding hair into the braid. They will continue to 'feed in' more hair as they braid down the shaft, gradually increasing the thickness of the braid until the desired size is reached. This is repeated meticulously for each section across your entire head.Step 3: Sealing the Ends
Once all the braids are complete, the final step is to seal the ends to prevent them from unraveling. The most common and effective method is dipping the ends in hot water. This not only seals the synthetic braiding hair but also helps the braids hang smoothly and straight. Your stylist will carefully dip the ends into a container of hot (not boiling) water for a few seconds. Other methods, like using a lighter to burn the ends, are sometimes used but are less common in professional salon settings due to safety concerns. Finally, a light mousse or finishing spray may be applied over the braids to set the style and tame any flyaways.Sizing and Length: Finding Your Perfect Knotless Look
One of the most exciting parts of getting knotless braids is customizing them to fit your personal style. The size and length you choose will dramatically impact the final look, as well as the installation time, cost, and maintenance level. Thinking about your lifestyle and aesthetic preferences beforehand will help you and your stylist decide on the perfect combination.
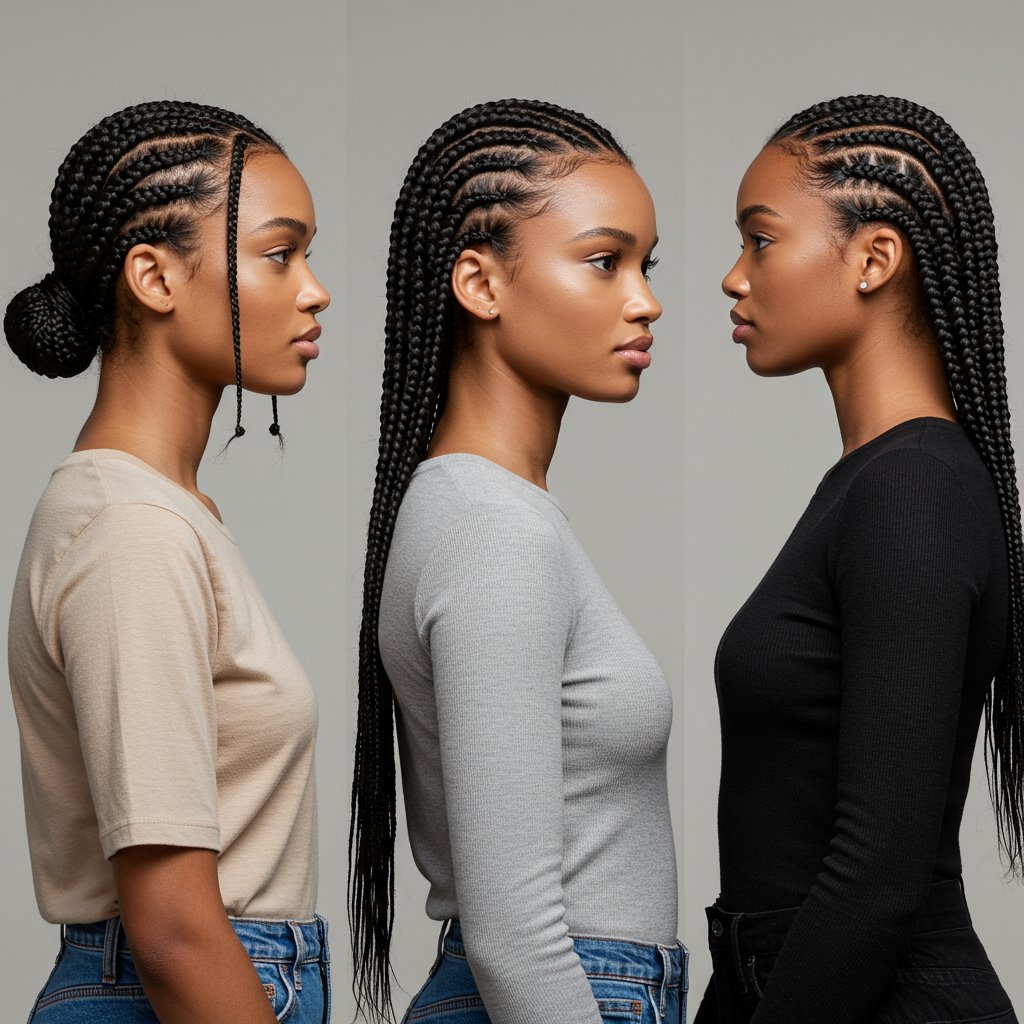
Small vs. Medium vs. Large Braids
- Small/Micro Knotless Braids: These offer a very full, voluminous look and incredible styling versatility. Because they are so small, they mimic the appearance of loose strands of hair, allowing for intricate updos. However, be prepared for a very long installation time (often 8+ hours) and a more intensive takedown process.
- Medium Knotless Braids: This is the most popular size for a reason. It strikes the perfect balance between fullness, manageable installation time (typically 4-7 hours), and styling versatility. They are large enough to be relatively quick to install and take down but small enough to still be lightweight and flexible.
- Large/Jumbo Knotless Braids: For a bold, dramatic statement, jumbo braids are the way to go. They have the shortest installation time (usually 3-5 hours) and are the easiest to remove. While they offer a chic, edgy look, they may offer slightly less styling versatility than smaller sizes and may not last as long due to the larger sections of natural hair.
Choosing Your Ideal Length
From a chic shoulder-length bob to dramatic waist-length tresses, the possibilities are endless. Shorter lengths, like shoulder or mid-back, are often more practical for daily life and require less maintenance. Longer lengths, such as waist or hip length, provide a stunning, high-impact look but can be heavier and require more care to prevent tangling. Consider your daily activities, your personal style, and your budget, as longer lengths require more braiding hair and may increase the service cost.Essential Aftercare for Long-Lasting Braids
Your knotless braids are installed and look perfect—now the goal is to keep them that way for as long as possible. Proper maintenance is key to extending the life of your style, keeping it looking fresh, and ensuring your natural hair underneath stays healthy and moisturized. A consistent routine will prevent dryness, itchiness, and frizz.

Daily Moisture Routine
Your scalp and natural hair still need moisture. Fill a spray bottle with water and a few drops of a light oil (like jojoba or grapeseed oil) or a water-based leave-in conditioner. Lightly mist your scalp and the length of your braids every day or every other day. This prevents your natural hair from becoming brittle and dry. Follow up by sealing in the moisture with a light oil applied directly to your scalp and part lines.Scalp Care and Cleansing
A clean scalp is a happy scalp. While you won't be washing your hair with shampoo in the traditional sense, you still need to cleanse your scalp every 1-2 weeks. You can do this by applying a diluted shampoo mix or a specialized braid spray directly to the scalp with a nozzle bottle. Gently massage with the pads of your fingers (not nails!) and rinse thoroughly by letting water run down the braids. Alternatively, you can use a cloth soaked in witch hazel or diluted apple cider vinegar to wipe down your scalp and part lines to remove buildup without a full wash.Nighttime Protection
This is a non-negotiable step. To protect your braids from frizz and friction while you sleep, you must wrap your hair. A large silk or satin bonnet is ideal, as it can accommodate the volume of the braids. If a bonnet isn't large enough, a silk or satin scarf can be tied securely around your hairline and the length of the braids. This simple step preserves the neatness of your parts and keeps the braids looking smooth and fresh for weeks.The Takedown: Safe and Gentle Braid Removal
All good things must come to an end, and after 4-8 weeks, it will be time to take out your knotless braids. How you remove them is just as important as how they were installed. A rushed or improper takedown can cause significant breakage, undoing all the benefits of the protective style. Set aside a few hours, be patient, and treat your hair with care.
Step 1: Cut with Caution
Start by cutting the end of each braid. Be conservative with how much you cut off—a good rule of thumb is to cut an inch or two below where your natural hair ends. If you're unsure, it's always better to cut less. Cutting too high is a recipe for an unwanted haircut.Step 2: Unravel and Detangle
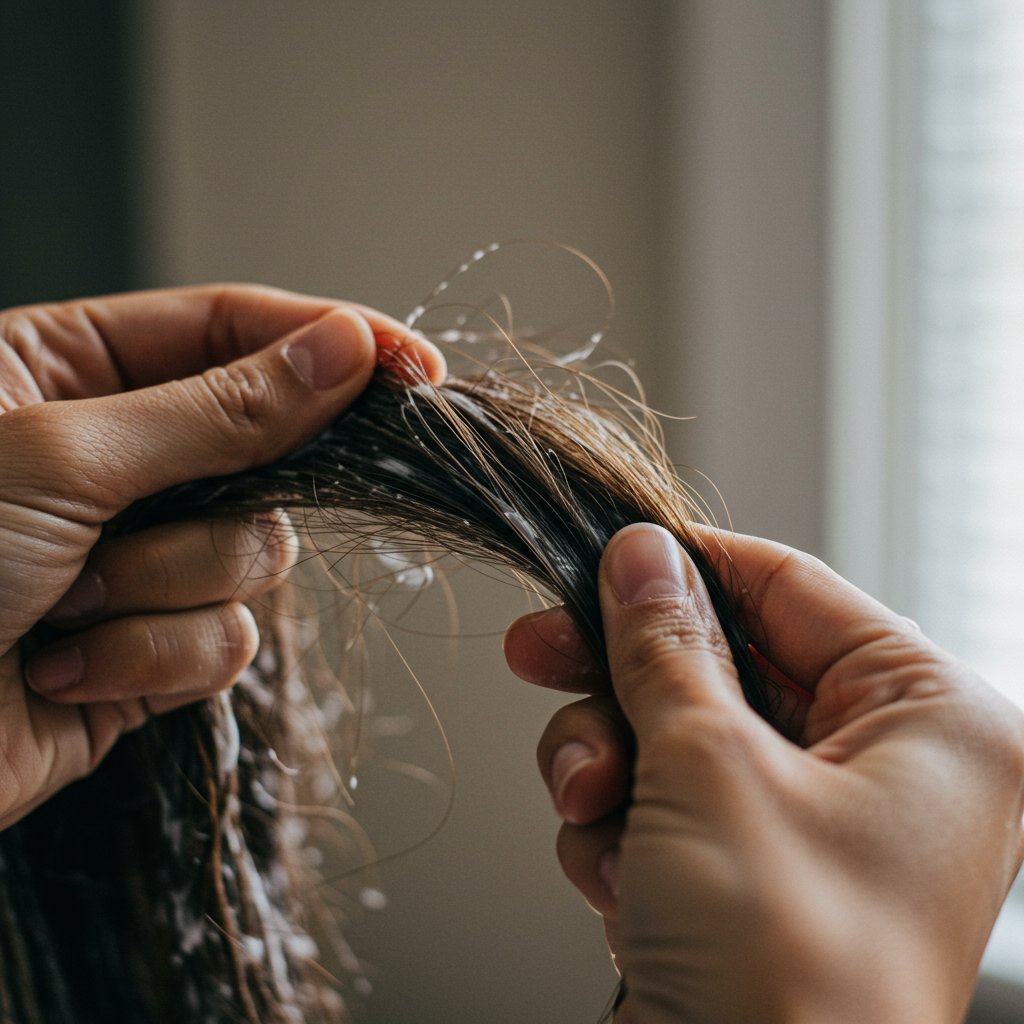
Apply a mixture of conditioner and oil (often called a 'slip mix') to the braid as you begin to unravel it from the bottom up. This will help soften any product buildup and make the process smoother. Once the braiding hair is completely removed from a section, use your fingers to gently detangle your natural hair before reaching for a comb. This is where most breakage can happen, so be patient and work through any knots or shed hair carefully.Step 3: Post-Takedown Treatment
After all the braids are out, your hair will have a lot of shed hair that has been trapped for weeks—this is completely normal. Before washing, it's wise to do a pre-poo treatment with a penetrating oil or conditioner to further soften and detangle. Then, proceed with a thorough cleanse using a clarifying shampoo, followed by a deeply hydrating and protein-rich conditioning treatment to restore strength and moisture to your strands. This final step is crucial for revitalizing your hair and preparing it for its next chapter, whether that's another protective style or wearing it out naturally.Pro Tips for the Best Knotless Braid Experience
- Communicate with Your Stylist: Be clear about the size, length, and part style you want. Bring inspiration pictures to your appointment.
- Don't Go Too Small on Your Edges: Ask your stylist to make the braids around your hairline slightly larger to reduce tension on these delicate strands.
- Speak Up if it Hurts: Knotless braids should be tension-free from the start. If you feel any pain or pulling during the installation, let your stylist know immediately.
- Don't Leave Them in Too Long: The maximum recommended time is 8 weeks. Leaving braids in longer can lead to matting, tangling, and breakage of your new growth.
- Choose Quality Braiding Hair: Use pre-stretched, hypoallergenic braiding hair for a smoother finish and to avoid potential scalp irritation.
Frequently Asked Questions About Knotless Braids
1. How long do knotless braids last? With proper care and maintenance, knotless braids can last between 4 to 8 weeks. The longevity depends on the size of the braids (smaller braids tend to last longer) and how quickly your hair grows.
2. Are knotless braids painful? No, they should not be. One of the primary benefits of knotless braids is that they are virtually painless due to the lack of a tension-creating knot at the base. You should feel comfortable from the moment you leave the salon.
3. Can I get knotless braids on short hair? Yes, but you will need a certain minimum length for the braid to hold securely. Generally, at least 2-3 inches of natural hair is required. Consult with an experienced stylist who can assess your hair's length and texture to determine if the style is suitable for you.
4. How much do knotless braids typically cost? The cost varies widely based on your location, the stylist's expertise, and the size and length of the braids you choose. Because the technique is more meticulous and time-consuming, they are generally more expensive than traditional box braids, often ranging from $175 to $600+.
5. Can I wash my hair with knotless braids? Yes, you can and should cleanse your scalp. Focus on the scalp rather than the braids themselves. Use a diluted shampoo in a nozzle bottle, gently massage the scalp, and rinse thoroughly. Avoid vigorous scrubbing, which can cause frizz and disrupt the parts. It's best to do this on a day when you have ample time to let them air dry completely to prevent mildew.
6. What's the main difference between knotless and traditional box braids again? The key difference is the installation. Traditional box braids start with a knot of braiding hair wrapped at the root of your natural hair. Knotless braids start with your own hair and gradually feed in the braiding hair, eliminating the knot and the tension it creates.
Conclusion: Embrace the Style, Protect Your Hair
Knotless braids have rightfully earned their place as a top-tier protective style. They offer a beautiful, versatile, and modern aesthetic without compromising the health of your hair and scalp. By eliminating tension, reducing weight, and providing a natural, seamless look, they represent a significant evolution in the art of braiding. From meticulous preparation to diligent aftercare and gentle removal, every step of the knotless braid journey is an opportunity to prioritize your hair's well-being.
Whether you're seeking a break from daily styling, protecting your hair during a seasonal change, or simply want to rock a gorgeous, long-lasting look, knotless braids are an outstanding choice. By following this guide and entrusting your hair to a skilled, professional stylist, you can confidently embrace this stunning style and enjoy all the beauty and benefits it has to offer.


